
Home Heating Oil Marketplace
The best home heating oil prices from companies near you.
Installing an oil tank can be an involved process. However, taking the measures described below and shown in the diagrams will help you in your journey in fuel oil tank installation.
Step 1
First, find a place for your new oil tank to be installed. Experts say indoor tanks are generally safer than outdoor tanks due to less external concerns like weather or falling debris which can cause unnecessary damage to the tank. Basements are usually well suited to holding oil tanks as they have solid cement foundations and are somewhat removed from household activity. A solid foundation is a must for an oil tank – check local codes to see if a certain depth is required.
Step 2
Find a brand-new oil tank – it is generally not advisable to install a used tank. Your tank must be UL listed, which indicates it has been reviewed for operational use. Typically, a heating oil tank for a home is between 200 and 350 gallons in capacity. Remember tanks can be very heavy as they are made of steel or another similar material. A full tank can weigh as much as a ton.
Step 3
To catch and contain any leaks you might face from your oil tank, install a drip pan in the spot where you plan to install your oil tank.
Step 4
Having metal legs on your oil tank (as shown in the diagram) is extremely important. You may have to attach them yourself if they are not already on your tank. Make sure the legs on the front of your tank (opposite to the outlet end) are slightly longer than the ones on the back. The slant will help provide space for the valve and filter. You can screw the legs into the base of the oil tank (refer to diagram).
Step 5
It is important that your tank is a safe distance away from any appliance that is fuel-fired: experts recommend at least five feet. You should be able to maneuver around the tank to ensure quality inspection. Leave at least four inches of space between the tank and the wall as well as the bottom of the tank and the floor.
Step 6
Remove the vent alarm plug, at the top of the tank. It is very important to install a vent alarm (or vent whistle). This whistle sounds while the tank is being filled, and stops when it is almost full. This helps prevent overflows. Vent whistles can also be a good way of checking if your tank is operating smoothly. Vent alarms are about six inches tall – use pipe thread sealant to secure them to your tank.
Step 7
Your tank should have a designated spot for your oil gauge. An oil gauge is a device that lets you know how much oil you have left in your tank. Just like with the vent whistle, use pipe thread sealant to seal it to your tank.
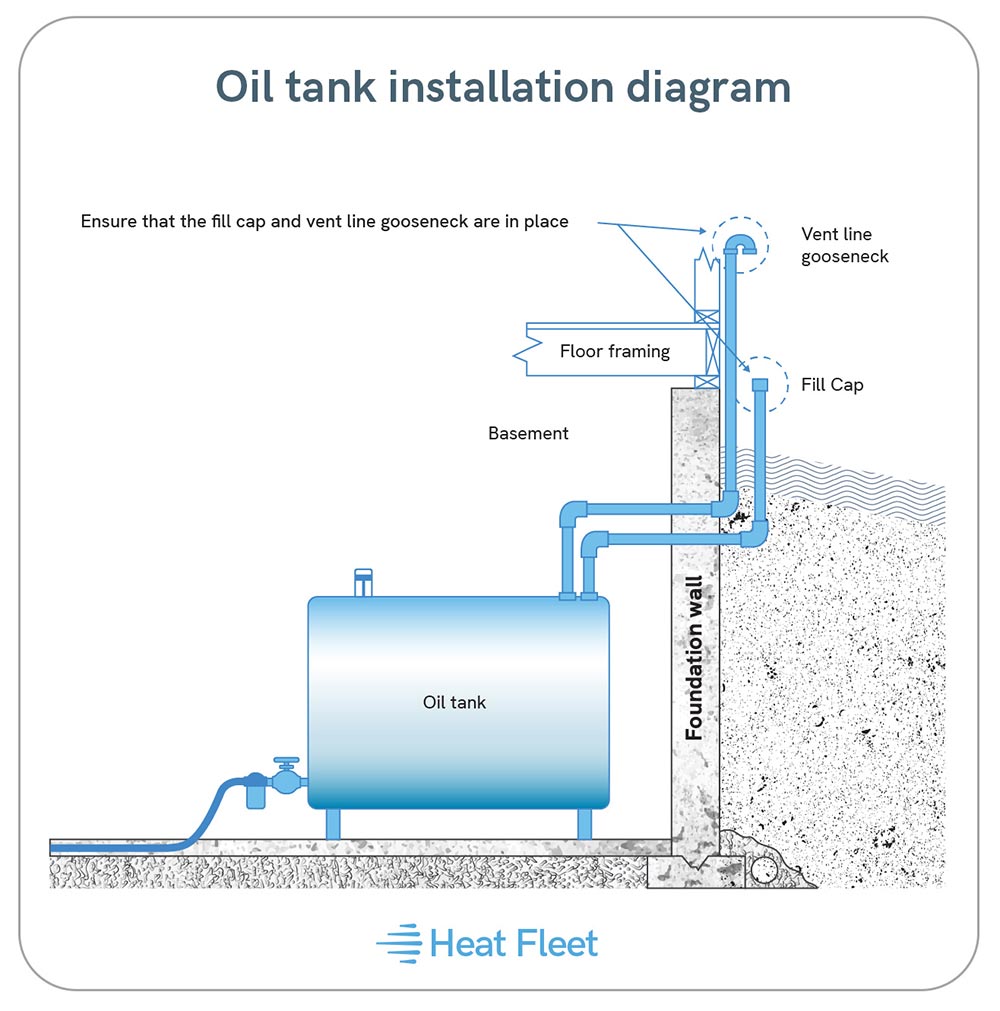
Step 8
There should be a cap on the fill line and the vent line holes, which are located opposite the supply connection line. Remove both of these caps. As the name indicates, the fill pipe is where the oil tank will be filled from. The piping, galvanized steel about two inches wide, will have to run outdoors. Place it near the foundation of the house and put a cap on the outside end of the pipe. A vent pipe will similarly run outside from the vent line hole. This piping, 1.25 inches wide, should also be capped at the outside end. Use pipe thread sealant on all connections to avoid leakage.
Step 9
In the front base of the oil tank (opposite to where you just installed piping in the fill line and vent line holes), install the oil filter and shutoff valve to the supply line. The shutoff valve connects to the supply line and stops oil from flowing in case there is an issue. The oil filter connects to the shutoff valve through compression fitting. As always, pipe thread sealant works well on these pipe connections.
Step 10
Now connect the supply line to the oil filter and compression fitting. The supply line should run along the perimeter of the walls in your basement (or wherever you chose to install your tank). In order to protect the line, apply some protection such as polyethylene-coated copper piping. The supply line runs directly to the furnace and is sealed with pipe thread sealant.