
Oil Tank Leak Repair
Oil Tank Leak Detection
In the New England area, the average oil tank is around 275 gallons. While this is ideal for keeping homes heated through the cold winter, the volume of liquid means spillage can be a real issue. To make matters worse, tanks are often in isolated areas of the house such as in the corner of a basement, which can delay the detection of leaks for days or weeks. How can you spot a leak an oil tank leak in your home?
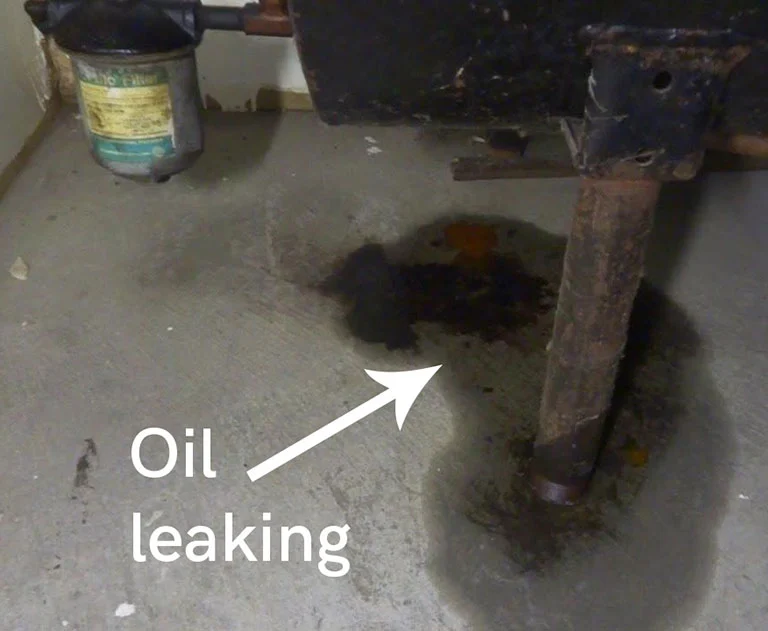
The first thing to check for is a damp spot on the bottom of the tank, sometimes near the seam. As the oil tank leak gets worse, the wetness will migrate up into the sides of the tank. The tank may also develop an oily smell. If the leak goes unnoticed for a while, dark icicle-shaped deposits may form on the bottom the oil tank. As these deposits grow, the floor underneath the tank will begin to be stained, usually a redder black color. An oil stain may also develop.
If you notice any of the signs of an oil tank leak, it is important to immediately report them to your oil dealer. In some states, by law, oil spills must be reported to the Fire Department which subsequently reports to the state Department of Environmental Protection. Not reporting a spill could lead to fines and environmental consequences.
Steps to Handle An Indoor Oil Tank Leak
- Call the fire department: As mentioned previously, any of the signs of an oil leak mean the fire department needs to be called. Oil can quickly catch fire, causing combustion which could lead to additional damage and complications.
- Ventilate the oil tank leak: Open any windows around the site of the leak and set up fans to blow fumes away.
- Blockade the leak: Do not let anybody, especially children, expose themselves to the leak.
- Secure your family’s health: In extreme cases, an oil leak can lead to health risks. Vapors can induce headaches, dizziness, nausea, and disorientation. The longer the exposure, the worse the symptoms. Relocating your family for a few days could be a smart decision until the spill is cleaned up. The urgency of the situation increases if you have small children or elderly relatives.
- Utilize an oil cleanup contractor: The oil tank will need to be repaired or replaced. You will need to contract a professional to advise you, carry out repairs, and recommend installing a new tank if necessary.
- Check your insurance policy: It is possible your homeowner’s insurance covers oil spills. By contacting your insurance company you can make sure you are covered and extend your coverage if you don’t already have it in your policy.
Fixing An Outdoor Oil Tank Leak:
It’s a little harder to see an outdoor oil tank leaking, but look for the same signs as an indoor tank and utilize the following steps.
- Take a soil sample. An environmental expert will help you analyze a soil sample from around your tank. The presence of any oil in this sample likely means you have an oil tank leak.
- Contact a tank removal contractor. Just like with an indoor tank, cleaning up is a job best left to a professional. Collect references from neighbors if your heating oil provider doesn’t cover tank removal or cleanup.
- Remove the tank. Unlike an indoor tank, a contractor will have to remove the tank. A buried outdoor tank is impossible to repair cleanly.
- Call the fire department. Again, it is important to report the spill for both the environment’s sake and for your own financial sake.
- Determine the severity of the oil leak. A contractor will likely figure out the extent of your oil tank leak the day they clean it up. It is important to make sure no fuel has leaked into the water table. This is verified through soil analysis both above and below your tank, as well as to the sides.
- Contact your insurance company. If your insurance has a clause that covers oil spills, you might be contacted by an adjuster who will review your property and the findings from the contractor who cleaned up. In some cases, the insurance company may handle any additional cleanup themselves.
- Clean up the mess. If your water table is undamaged and the insurance company is not involved further, you will need a contractor to fill the void left by the tank with fresh soil. An analysis of said soil will be conducted to make sure it is up to state standards. The mess should also be cleaned up completely – your backyard should look as it did pre-spill.
- File the paperwork. Whoever cleaned the mess will file a No Further Action letter with the state and give you a copy which you should keep secure.
Oil Tank Leak Prevention
It is important to secure your tank to prevent a recurring or first-time oil tank leak.
- Protect the fuel oil lines that run from the tank to the furnace by putting concrete over them or wrapping them in tubing. This will help avoid leaks from damage to your lines as well as further complications from faulty lines.
- Tighten and clean all pipe connections. Instructions for installing piping can be found here – follow the directions to avoid spillage.
- Monitor your fuel usage. If you seem to be using significantly more fuel than you have in years past, it might be time to do some investigation.
- Check up on the fuel tank and the lines. Tanks older than 20 years old should be heavily considered for replacement, even if you can’t physically see anything wrong with them.
- Monitor tank legs. Check the tank legs to make sure they are not bent and are still holding the tank upright.
- Schedule maintenance. Yearly maintenance, generally before the cold weather begins, is recommended. Oil tank leaks can be avoided through recurring maintenance and efficiency can be ensured.